Mastering Elementor – Building a site with Less Coding
Building a website has become an essential task for businesses and individuals alike in today’s digital age. With the rise of web development tools such as Elementor Pro, creating a professional and visually appealing website has never been easier. However, before diving into the process, it is crucial to analyze the available resources and understand the steps involved in building a WordPress website with the Elementor framework. This article will guide you through the process and provide valuable insights to ensure a successful web development journey.
Though I personally prefer and started wordpress website development without a page builder tool. But lately the client’s preferred a framework or tool where they can update websites on their without much or any coding at all. This is where page builders help!
![]()
![]()
Pre-requisites for Learning to develop WordPress websites with Elementor Pro:
A localhost environment or if you can afford a web server space well and good but optional. If you are a beginner and like to learn on developing the site localhost on your computer, you can follow this tutorial on xampp. This will help you understand setting up wordpress in localhost along with mySQL Database on your system. When I am writing this article, in India there are many hosting providers offer monthly plans which are competitive enough in pricing. MilesWeb is my favorite provider which starts as low as ₹250/monthly starter plan.
Essential Plugins: Elementor Pro, Advanced Custom Field (ACF).
- Overview of Elementor Pro
- The Benefits of Advanced Custom Fields
- The Power of Creating Elementor Loop Templates
- How to Use Elementor Pro, Advanced Custom Fields, and Loop Templates Together
- Real-World Examples of the Combination in Action
- Tips and Tricks for Optimizing Your Website’s Performance
- Conclusion and Final Thoughts on Using These Tools in Your Web Design Workflow
1.Overview of Elementor Pro
Elementor Pro is a powerful website builder plugin for WordPress that offers a range of advanced features and functionalities. Unlike the basic WordPress editor, Elementor Pro provides a live frontend editor, allowing users to visually design their websites in real-time. With Elementor Pro, users can easily create complex forms, posts, WooCommerce pages, slides, and more. One of the standout features of Elementor Pro is its Theme Builder, which enables users to customize every aspect of their WordPress site using the intuitive Elementor interface. This level of customization and control makes Elementor Pro a preferred choice for web professionals, including developers and designers.
FRIENDLY USER INTERFACE
Elementor Pro offers a wide range of features and benefits that enhance the website design and development process. One notable feature is the ability to visually design website headers and footers, including sticky headers [5]. This level of flexibility and control allows users to create unique and visually appealing website layouts. Additionally, Elementor Pro provides access to a vast library of professional templates, making it easy for users to create stunning websites without starting from scratch. The drag-and-drop functionality of Elementor Pro simplifies the website building process, enabling users to create their WordPress websites with just a few clicks.
1.The Benefits of Advanced Custom Fields

One of the key advantages of using Advanced Custom Fields (ACF) in web development is the enhanced content management it offers. With ACF, you have more control over your content, allowing you to incorporate structured data into your text. The ACF plugin enables you to take full control of your WordPress edit screens and customize your field data, making content editing a breeze. This level of control and organization ensures that your content is structured and easily manageable, leading to a more efficient and streamlined content management process.
Another benefit of using Advanced Custom Fields is the improved user experience it provides. ACF allows developers to add a variety of field types, such as text boxes and image uploads, without the need for custom code. This means that website users can interact with your content more seamlessly and intuitively, resulting in a more engaging and user-friendly experience. Additionally, ACF’s flexible content field offers limitless possibilities for customization, allowing for unique and visually appealing page layouts. By enhancing the overall design and functionality of your website, ACF contributes to a positive user experience.
In addition to enhanced content management and improved user experience, Advanced Custom Fields offers increased flexibility and customization options for web developers. ACF allows you to create unlimited custom fields and organize them into field groups. This level of flexibility enables you to tailor your website’s content and design to meet specific requirements and objectives. Whether you need to assign fields and inputs to page templates or posts, ACF provides the tools and capabilities to customize your website according to your needs. This level of customization empowers developers to create unique and personalized websites that stand out from the competition.
3. The Power of Creating Elementor Loop Templates
The Elementor loop refers to a series of blog posts, products, or any custom post type that are displayed in a particular section of your site. By creating custom loop templates with Elementor, you gain full control over the design and layout of the loop section. This means you can personalize it to match your brand identity and style. You can select which post elements to display, such as the post title, featured image, date, author, and more.
With the vast collection of styling options and widgets provided by Elementor, you can create beautiful and engaging loop templates to captivate your website visitors. Moreover, custom loop templates allow you to showcase your content in a more organized and visually appealing manner.
You can add custom filters, such as categories or tags, to help users navigate through your content more efficiently. This feature is especially useful for e-commerce websites, where you can display products based on their attributes, prices, or popularity. Overall, the power of creating Elementor loop templates lies in the ability to enhance your website’s appearance, improve user experience, and present your content in a more organized and visually appealing manner.
4. How to Use Elementor Pro, Advanced Custom Fields, and Loop Templates Together
Elementor Pro, Advanced Custom Fields (ACF), and Loop Templates are powerful tools that can be used together to enhance the functionality and design of your WordPress website.
Thought process should be applied before hand on how you want to have a rich and visually appealing user experience on your blog really matters. Most of the website blogs comes with a default layouts and schema of designs which are free. But with the help of the above 3 tools you can take the design to the next level and the user experience results will be stunning!
ACF – Elementor
ACF, on the other hand, is a plugin that allows you to add custom fields to your WordPress website. With ACF, you can create fields to collect and display additional information for your content. When combined, Elementor Pro and ACF provide a seamless user experience. Elementor Pro’s dynamic content feature enables you to use ACF custom field data directly within your web pages. This means that you can dynamically display content from ACF fields without any coding knowledge.
Targeting the wordpress taxonomy template
Developing a Elementor Pro website on WordPress requires a systematic approach to ensure a smooth and efficient process. Here I will share a smart development tip on how to leverage your design with resources in hand against dynamic loop templating. Elementor’s theme builder has it’s unique templating system. When you create a template, you make place holder for the title, content, featured image, other elements, ACF fields if any etc., Once satisfied you proceed to Publishing the template. This is were you target which category the design should be applied and publish it.
By using Loop Templates, you can take your customization a step further. Loop Templates allow you to design custom layouts for archive pages, single post pages, and more. With Elementor Pro’s integration with ACF, you can add ACF custom fields to your Loop Templates and create unique and personalized templates for different content types.
Lets look at Smart designs with Elementor Dynamic Loop combining taxonomies
All website blog articles can be further classified into taxonomies like categories or tags
For example; If you are writing blog articles on Food you will have multiple categories like 1.vegan, 2. salads, 3.main course, 4. deserts etc.,
Think about a user experience like when they land on your landing page the archive of all these items have same grid template. But they dive in to read each article, given it’s own category identity you can target the design elements with a loop system for each category.
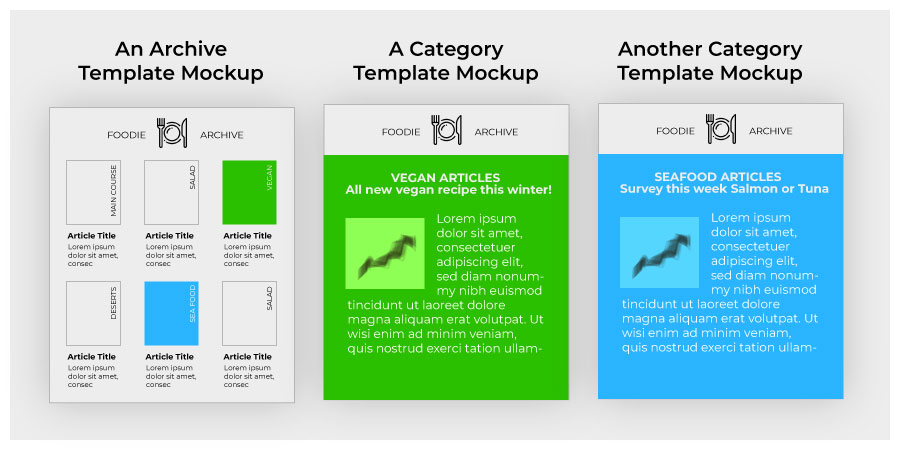
Thus each category article page can be with it’s own Identity like background color, unique style of heading, content style etc. Overall, the combination of Elementor Pro, ACF, and Loop Templates provides a powerful and flexible way to customize and enhance your WordPress website.
5. Real-World Examples of the Combination in Action – WooCommerce Single Product template
So far so good designing & developing! Let’s unleash the maximum potential of Elementor in Action.
Break the usual looking default templates and add spice to your design. Which will look more modern and out of the box thinking. And this is where you can showcase your creativity, combined with the tools in hand.
Let’s look at a design of a normal single product view versus an enhanced design view of the same with rich user browsing experience with real-world resources.
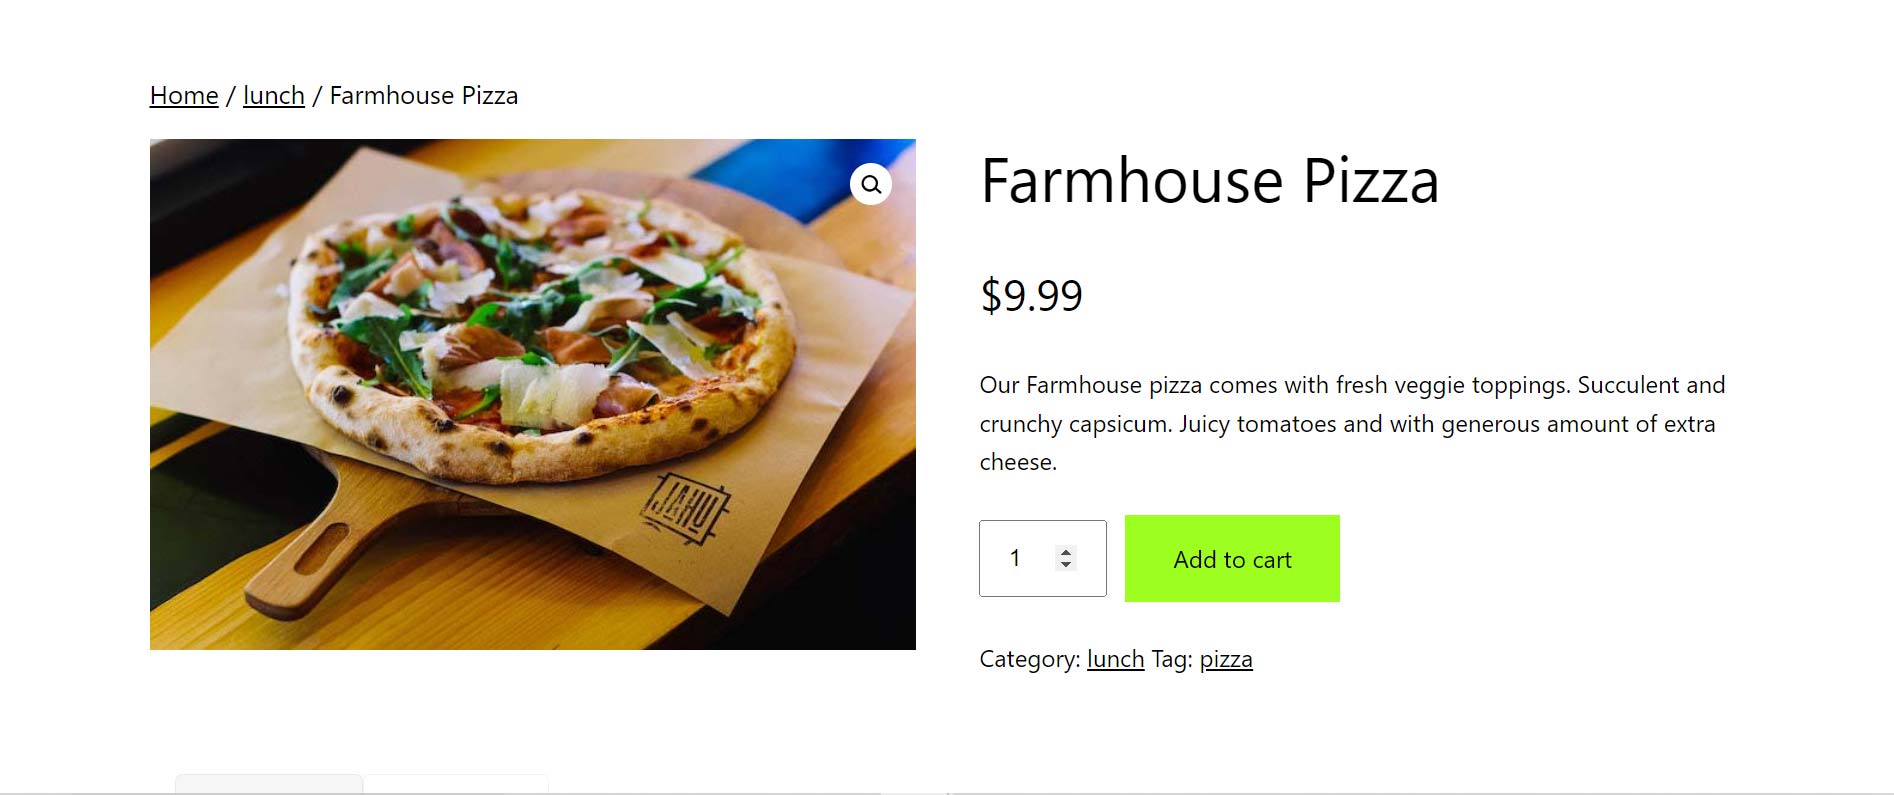
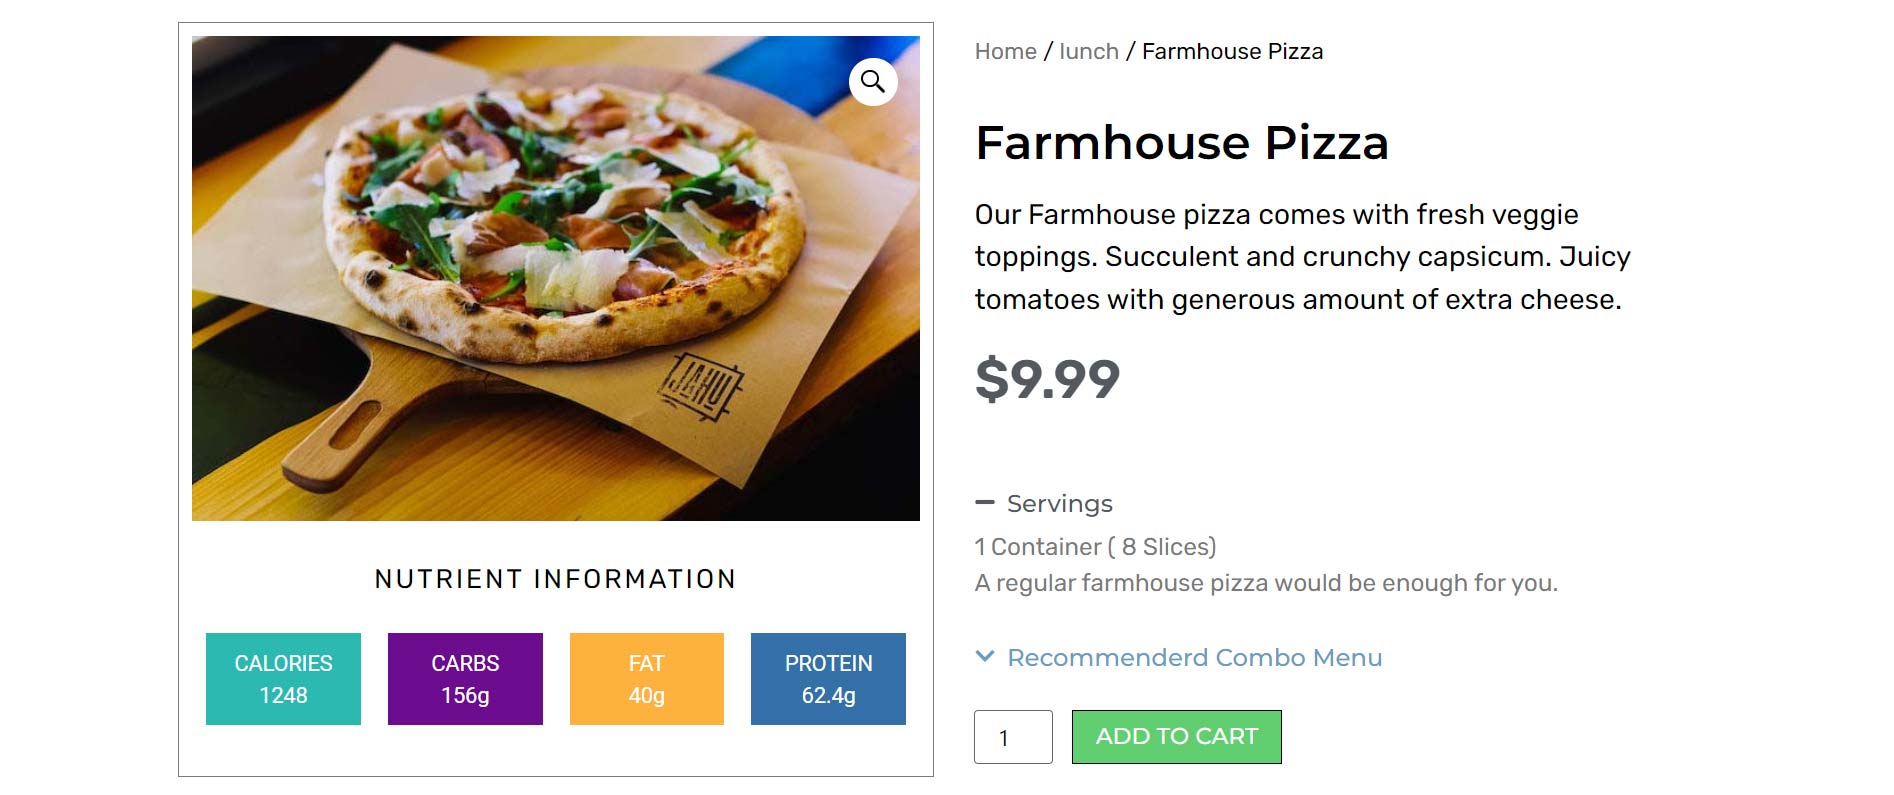
The first picture shows the default template which comes from WooCommerce product single page view. And the second shows, how we can customize the same template with more information and enhance it’s design. Where the user can see more useful information in a structure manner.
For an example; A store selling online pizzas. The standard approach in selling are: 1.name of the product, 2. an visual image of the product and 3. price. What if the seller has additional information which may be useful to the customer. In this case, let’s assume we have additional information. A pizza has this much of calories, fat, protein etc.,
Now we have sufficient information for the product single view. Look at the 2 images below. First one is the default design of WooCommerce default template. The second one is more intuitive one done with Elementor, ACF Fields and other elements.
Just the ‘Title’, ‘Description’, ‘Price’, ‘Product Image’.
Defaults + ACF Fields + Customized Elements like Accordion etc.,
6. Tips and Tricks for Optimizing Your Website’s Performance
Mastering elementor optimization
By using Elementor Pro, it is essential to optimize its performance to ensure a smooth user experience. Here are some useful tips and tricks to enhance your website’s performance with Elementor Pro.
Firstly, make sure to optimize your images. Large-sized images can significantly slow down your website. Use image optimization tools like Smush free version
Secondly, minimize the use of external fonts and scripts. Too many fonts and scripts can lead to longer loading times. Only include the essentials, and consider using Elementor’s Font Awesome integration to reduce external script requests.
Next, enable lazy loading for images and videos. This feature will load media files only when they come into view, reducing initial page load times.
Additionally, use caching plugins to create static versions of your website, reducing database calls and improving load times for returning visitors.
Regularly update Elementor Pro and its add-ons to benefit from performance improvements and bug fixes.
Lastly, consider using a reliable hosting provider and choose a plan that can handle your website’s traffic.
By implementing these tips and tricks, you can significantly optimize your website’s performance with Elementor Pro, providing visitors with a seamless browsing experience.
Conclusion and Final Thoughts on Using These Tools in Your Web Design Workflow
We have seen the advantages of all the above tools and real-world examples. Not every site may need tools are additional functionalities as long as content is needed in regular reading format.
There are many use cases we can correlate and apply these techniques as required on merit basis.
Elementor Pro design may be interesting while you start designing. As you have the advantage of drag n dropping all the available widgets and play around. Just for the sake fanciness we can’t test too many elements. Which might distract the user and confuse whether they are looking what they need.
So keep organized on what you want to achieve with the design. Purpose it and start developing each necessary layer of work on merit basis.
Best DO’s & DONT’s on your design & development:
DO’s
Follow simple UX standards known to basic users
Compliment user friendliness and minimalist design
Approach with common design elements
DONT’s
Don’t push too much creativity
Don’t clutter elements
Avoid complex or fully new layout